
Making an organic cotton drawstring backpack for kids is a fun project, and the bag is truly versatile! In this step-by-step tutorial, I will let you know our secrets on how we make a professional looking backpack with drawstring closure. I will also explain how to string a drawstring backpack with 2 strings.
Our products are always made from organic cotton fabric. In this tutorial, we choose to use organic and natural materials as well. I recommend using organic cotton when making your own DIY sewing projects as it is far more sustainable than using conventional cotton.
These may not be the most time-efficient or simplest sewing instructions for a drawstring backpack. Still, I promise it's worth the time and effort to get a neat, sleek, and professional result! Take a look at the end result here!

Materials and tool required
- Cord
- Exterior fabric
- Lining fabric
- Pocket fabric
- Thread
- Sewing machine and overlock (optional!)
- Scissors or a rotary cutter
- Safety pin
- Sticky tape
Preparations
- Start with doing a paper or cardboard template for the exterior, lining and pocket fabric. The seam allowance is included in the measurements:
- Exterior template: 32x40.5cm
- Lining template: 32x34.5cm
- Pocket template: 17x21cm
- Cut 2 pieces of cord, 1.5m each
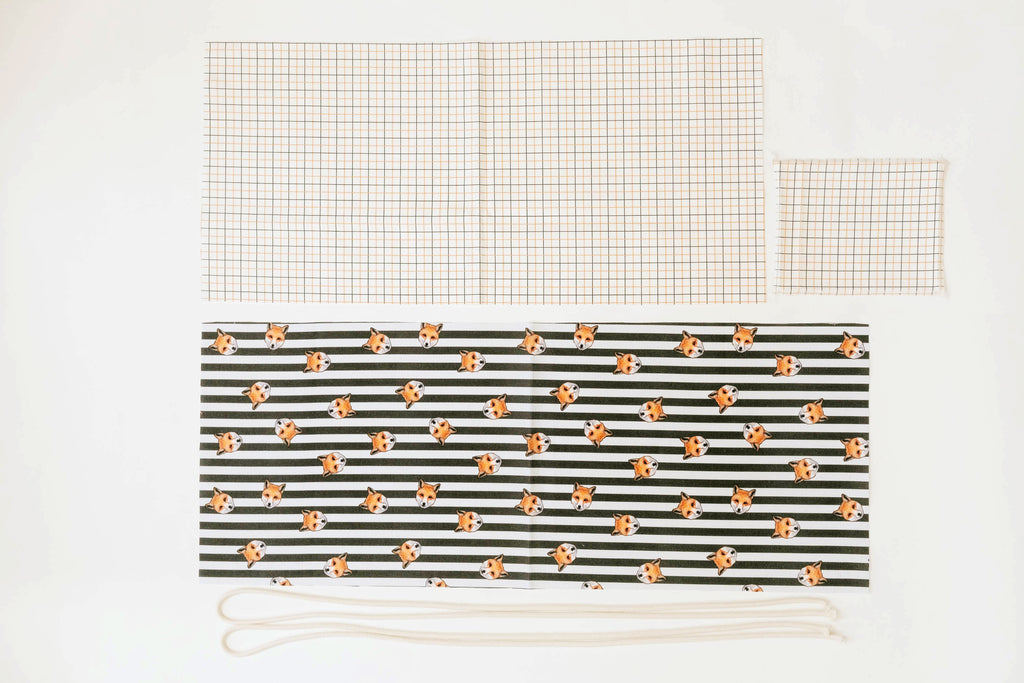
- Place the lining and exterior fabric double-folded and cut it with scissors or a rotary cutter according to the template. Place the short side of the template at the fold to avoid a seam here. Next, place the pocket fabric single folded and cut according to the template. We use a custom printed half Panama organic cotton canvas from Cotton Bee and organic cotton cords from Charle Premium Haberdashery with a diameter of approx 7mm.

- Measure 4 cm from the top of the exterior fabric and make a small cut on each long side.
- With the exterior fabric's false side up, fold at the small cuts and iron flat. Once ironed, unfold the exterior fabric.

- Sew with overlock or a zigzag stitch along all sides of the exterior fabric, lining fabric and pocket. We do this because the canvas frays easily. It also makes the overall look of the drawstring backpack neater.

Making the pocket
- With the fabric's false side up, fold the top short end of the pocket 1 cm and iron flat. Fold once again but this time 2.5cm and iron flat. Once ironed, unfold.
- Fold the remaining three sides 1 cm and iron these flat.
- Fold over the first short end at the crease and iron the pocket flat, neat and tidy.

- Sew the 2.5cm top fold close to the edge with a straight stitch.
- Lay the inner fabric flat with the right side up and place the pocket 7 cm below the top. Make sure it is centered from the sides.
- Pin the two pieces together. Sew first with a straight stitch close to the edge and then a second stitch one presser foot width from the first stitch. Stitch back and forth a few times at the top making the pocket withstands a bit of tugging. We also stitch back and forth at the very top, in-between the two stitches, making the pocket even more resilient at the opening.

Sewing the inner bag (lining)
- Fold the lining fabric in half false side up and sew the long sides together with a straight stitch. Sew with 1 cm seam allowance. Leave a 10cm opening at the bottom, enabling you to turn the bag right as one of the final steps.

Sewing the outer bag (exterior)
- Fold the exterior fabric in half, false side up. Look for the top fold you ironed previously. It should be 4cm from the top. Make a mark a few mm below it. Make another mark 3cm below the first mark. Make a third mark 3 cm above the bottom fold. Repeat these markings on both sides.
- Sew with 1cm seam allowance with a straight stitch from the top to the first mark. Make a gap (3cm) to the next mark and then continue down to the third mark.
- The gaps on both sides make a channel for the cord to run through at the top and an opening to attach the cord at the bottom.

- Turn the bag, right side up, and sew along the cord channel opening, approximately 7mm from the opening. Use a straight stitch. This secures the seam allowance, makes the opening more tug resistant and makes the drawstring backpack look more professional and neat.

Sewing the lining and exterior bag together
- Turn the outer bag right side up and the inner bag false side up.
- Place the lining inside the exterior bag.
- Pin the bags together edge to edge, starting from the side seams. Keep the side seams straight and neat.

- Sew together the bags at the top, leaving 1 cm seam allowance.
- Sew back and forth a couple of times across the side seams to reinforce them.
- Pull out the lining - you now have one large piece with the false side up.

- Find the 10 cm gap in the inner bag and turn the bag inside out, making it right side up.
- Place the inner bag in the outer bag again and press the bottom corners into one another.

- The exterior bag should fold over into the lining 3cm. Iron the top neatly and flat.
- Sew the cord tunnel at the top following the edge of the inner bag (approximately 3cm below the top).

How to thread a drawstring backpack with lining
The cute drawstring backpack is soon ready! The last stages are not very complicated but include many steps. I made a tutorial video that shows you how we finish our backpacks in-depth! These last steps make the bag look really professional, sleek, and minimalistic, so it's worth looking through the video and following these pro tips.
I hope you found this step-by-step tutorial helpful! This is precisely how they are made at Snella in our atelier. As you can see, there are many steps, and the process is time-consuming. Still, we think it is worth it because the style and quality look good!
The drawstring backpack dimensions can be changed according to your own preference. However, we think this size is suitable for children and their needs.
Suppose you like the style of this bag but find that it is too complicated to sew yourself. In that case, I can recommend looking through the selection of our organic cotton drawstring backpacks here!
Good luck with your sewing project!
Hannah